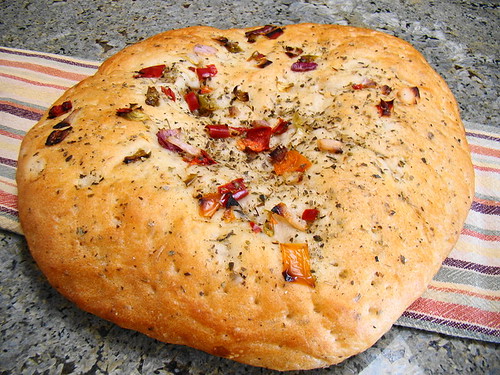
Everyone loves relishing slices of warm Focaccia Bread dipped in olive-oil pesto or some olive oil and vinegar. In fact, there are so many ways to enjoy this Italian classic bread, top it with your favorite veggies to make a quick Pizza, use as a base to make some Bruschetta, bake it as a flatbread, or eat it nice and warm with your favorite bowl of pasta – this is one bread recipe that never fails to impress!
If you think I’m on a bread-baking/posting spree, then so be it! The recipe below has been adapted slightly from this Rustic Italian Bread recipe, and the photo is taken by Janet Hudson from the Vegan Feast. For those who need more detailed instructions on How to Bake a Bread, this web page about bread baking tips is an excellent resource.
I had always been intimidated about baking a bread too, until I baked my first batch of Wheat Bread at home. But once you do it, let me tell you it can get addictive, and baking your own bread can become an obsession. But this is one obsession that is good for you, and will save you some money too! So take the plunge, and kick off your bread baking adventure with this delicious Focaccia Bread recipe, topped with Rosemary, Caramelized Onions, Herbs and Sun-Dried Tomatoes for a deeply satisfying culinary experience.
Rosemary Focaccia Bread with Caramelized Onions & Sun-Dried Tomatoes
Ingredients
3 cups all-purpose flour
1 pack dry active yeast
1 cup lukewarm water (not hot!)
1 tsp salt
1 cup boiled mashed potatoesTopping
2 tbsp finely chopped caramelized onions
2 tbsp finely chopped sun-dried tomatoes
1/2 tsp dried oregano
1/2 tsp rosemary seasoning
1/2 tsp garlic salt (optional)Method
Preparation Stage
Sift the flour into a large bowl. Mix in salt, and then create a large well (an empty space) in the middle.Pour the yeast into the well and pour 1 cup of lukewarm water over the yeast. Sprinkle about 1 tbsp. of flour over the top. Wait for about 10 minutes, until you see bubbles starting to appear in the yeast.
Once you see the bubbles, start mixing the ingredients together with clean hands. You can use a dough machine, but working with hands is the best way to aerate the dough, and will get you the best results!
Kneading the Dough
Gradually incorporate the flour from the sides of the bowl into the bubbling yeast mixture. Also add the mashed potatoes, little at a time. The dough may look sticky, but use some flour and it will end up smooth and non-sticky at the end of the kneading process. Keep doing this until it all comes together as a firm ball of dough. This stage is known as Pre-Kneading. If the dough is too sticky, add a little more flour to make it easier to knead.Now remove the dough from the bowl and place on a lightly floured surface. Knead it by pushing your palms into and then turning it one quarter. Keep kneading and doing quarter turns for about 5-10 minutes; as you keep doing this, the dough will become light and supple, and non-sticky in texture.
Place the dough in another lightly floured bowl and cover with a damp cloth. Let it rise for about 1 hour, until it doubles in size.
Baking the Bread
Prepare a baking pan by lightly oiling it and sprinkling the bottom with flour.Sprinkle some more flour on your counter-top and keep ready. Transfer the dough from the bowl to the counter-top, an start Punching it – literally:) This process creates air bubbles that will make the bread rise. Shape it again into a round loaf and put it on the baking pan. Cover with dish towel and let it rise for another 1 hour, till it doubles in size again. While you let it rise, preheat oven to 400 F, ready for baking.
Drizzle your dough lightly with olive oil, gently poke all around lightly with your little finger, and sprinkle with your favorite toppings and herbs. Now put the baking pan in the oven and bake for about 25-30 minutes, until it gets lightly browned, and looks evenly cooked.
Once done, remove it from the oven, wait 5 minutes, then turn it out of the pan onto a rack. Serve warm or at room temperature, with your favorite dipping oil recipe!
Bread Baking Tip:
1. If your yeast does not bubble, it’s no longer active or you didn’t use lukewarm water. You should start over again in this case, because otherwise the bread will not rise.
2. The kneading stage is extremely important, and this should be done slowly to let air bubbles trap into the dough. Also, allowing the dough to rise is a step not to be skipped. This is what gives the airy spongy texture to the bread
3. If you don’t find active yeast, you can use Instant yeast, which is tinier and slightly more potent than active dry yeast. But the main difference between instant and active dry yeast is that instant yeast can be added directly to flour, whereas active dry yeast needs to be dissolved in warm liquid before it is combined with flour.
Baking a bread can be intimidating at first, but if you use fresh active yeast, which is not too old, and have the patience for the kneading/rising process, you will end up with a beautiful Focaccia Bread. And once you master this recipe, you can experiment with as many toppings as you like, and any shapes that you want – braided, flatbreads, or even sticks!
Related Recipes
Tandoori Peshawri Naan
Irish Brown (Soda) Bread
Chocolate Zucchini Bread
Related Posts
- Vegetable Bread Rolls
Sandwiches are great finger food, but if you are looking for a Looking for a…
- Chocolate Zucchini Bread
The smell of a freshly-baked Chocolate Zucchini Bread can be tantalizing, and a serious booster…
- Pumpkin Spiced Bread
Pumpkin Spiced BreadHalloween is just around the corner, and its a good time to bake…
















HI MANSI
Can you give me the recipe of pav bhaji
Adore focaccia – I made aone with rosemary and olives some time back.
Looks so lovely! I guess it must be tasty!
Oh love this bread :))
Wow, that is simply amazing looking bread. Simply yummy !!!