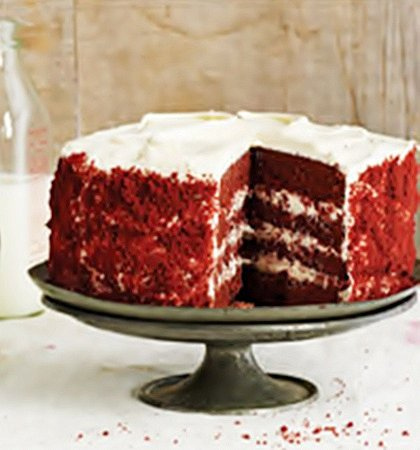
There’s nothing like celebrating a Birthday with a beautiful b’day cake. And it does not matter if you are pushing over your 30’s or nearing your 40’s. A cake is a great way to get over the aging pangs, and a cake that looks as beautiful and delicious as this Red Velvet Cake, is sure to put a smile on your face, no matter how gloomy you feel! I’ve had RV cupcakes before, but this lovely ruby-red cake featured in Fine Cooking is no doubt a stunner. The original recipe comes from the dessert cookbook DamGood Sweet , by David Guas, Raquel Pelzel [photo by Ellen Silverman], and if reviews are to be believed, this is a winning recipe.
A Red Velvet Cake is nothing but a Devil’s Food Cake that has red food coloring added to it. The buttermilk adds a nice smooth texture to the cake, and the deep red layers mingled with cream cheese frosting are inviting to the eyes. The bold look is complemented by the delicate vanilla and chocolate flavor. So if you need a cake recipe that will leave an impact, be it a birthday or a valentine, then this is the perfect recipe for your special occasion.
Red Velvet Cake
Ingredients
For The Cake
2 sticks (1 cup) plus 2 Tbs. unsalted butter, at room temperature
3-1/4 cups all-purpose flour
1/2 cup Dutch-processed cocoa powder
1-1/2 tsp. baking powder
1-1/2 tsp. baking soda
1/2 tsp. salt
1 (1-lb.) box light brown sugar (about 2-1/4 cups)
3 Tbs. red food coloring
2-1/2 tsp. vanilla extract
3 large eggs
1-3/4 cups buttermilkFor The Frosting
1-1/4 lb. cream cheese, at room temperature
2-1/2 sticks (1-1/4 cups) unsalted butter, at room temperature
2 tsp. vanilla extract
1 (2-lb.) bag confectioners’ sugar (about 7-1/4 cups)Method
Heat the oven to 350°F. Grease two 9-inch cake pans with 1 Tbs. of butter each. Add 2 Tbs. of the flour to each pan and shake the pans to coat the bottom and sides. Tap out the excess flour and set the pans aside.Sift the remaining 3 cups of flour with the cocoa, baking powder, baking soda, and salt, and set aside.
In the bowl of a stand mixer (or in a large bowl if using a hand mixer) cream the remaining butter with the brown sugar, food coloring, and vanilla on low to combine. Increase the mixer speed to medium-high and beat until aerated and pale, about 2 minutes.
Reduce the speed to medium and add the eggs, one at a time, beating thoroughly between each addition and using a rubber spatula to scrape the sides and bottom of the bowl as necessary. Reduce the speed to low and add one-third of the dry ingredients followed by half of the buttermilk. Repeat, finishing with the final third of the dry mix. Scrape down the bottom and sides of the bowl and divide the batter between the two prepared cake pans, spreading it out as evenly as possible.
Bake until a cake tester inserted into the center comes out clean and the center of the cake resists slight pressure, about 40 minutes. Cool on a wire rack for 15 minutes, and then run a paring knife around the edges of each pan to release the cake from the sides; invert the cakes onto the cooling rack. Cool for 1 hour, and then wrap each cake in plastic wrap for at least a few hours.
To make the frosting
Beat the cream cheese, butter, and vanilla together in the bowl of a stand mixer (or in a large bowl if using a hand mixer) on low speed to combine. Increase the speed to medium-high and beat until aerated and light, about 2 minutes. Stop the mixer and add a few cups of the confectioners’ sugar, incorporating it into the cream cheese mixture on low speed until combined. Repeat with the remaining sugar, adding it to the mixer in two additions. Once all of the sugar is added, increase the speed to medium-high and beat until fluffy, about 1 minute.Assembling The Layers
Unwrap the cake layers. Slice off the rounded top 1/8 inch of each cake and place the trimmed-away portion in the bowl of a food processor. Slice each cake in half horizontally (you’ll end up with 4 layers), working over a baking sheet to catch any crumb. Add the crumbs to the food processor and pulse until fine.Place one cake layer on a cake round or large plate (make sure that the diameter of the plate is at least 1 inch larger than the cake). Use an offset spatula to evenly spread a heaping 3/4 cup of frosting on the first cake layer. Repeat with the remaining three cake layers, ending with a bottom half of a cake on top, browned-side up (so you don’t get cake crumbs in the frosting).
Spread the remaining frosting over the top and sides of the cake (the sides don’t have to look perfect—you’re going to cover them with cake crumbs anyway). Gently press a handful of the reserved crumbs into the side of the cake until all of the sides are evenly coated. Refrigerate for at least 2 hours before serving.
It is a very moist and dense cake, and the frosting has perfect texture. Some people might have a problem with the red food color, but a RED velvet cake needs to be red, plus the food color available in markets these days is very safe. I guess you could try using beetroot juice to impart the red flavor, but that would alter the taste and flavor too. If someone has tried it this way, do let us know how it turns out.
Related Recipes
Raspberry & White Chocolate Cheesecake
Pineapple Cake with Coconut Buttercream Frosting
Strawberry Cake with Pink Meringue Frosting
Related Posts
- Baked Oatmeal Cake
Baked Oatmeal CakeWe all know how healthy Oatmeal is, for kids and parents alike, and…
- Tres Leches Cake Recipe
If you haven't yet indulged into a sinful bite of the Tres Leches Cake, you…
- Eggless Chocolate Cake Recipe
Its always good to have a tried-and-tested Eggless Chocolate Cake recipe! Eating a cake is…










Hi Bree, I would not use the same recipe for cupcakes, b’coz this is a layered cake, and using same measurement of ingredients will mess up the ratio in cupcakes. I have baked red velvet cupcakes from KAF site earlier and would recommend them.
I plan to post my version soon, until then, you can use the recipe from this link:
http://www.kingarthurflour.com/recipes/red-velvet-cupcakes-recipe
Hope this helps!
hi, can i use the same recipe into cupcakes? would you know the right baking time and temperature? thanks
Sounds like absolute fun, looks wonderful too 🙂